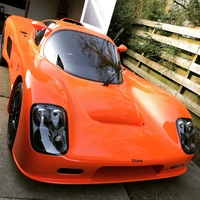
Here's the story of my Ultima GTR build and it's progress. An initial deposit was put down in February 2013, with the powder coated chassis ready at the factory in May. It was the brand new updated version the Factory had been working on in 2012. I added the 80mm pedal box extension for the taller driver plus a full FIA roll cage. Whilst the chassis was being fabricated and powder-coated I readied the garage with fresh paint, insulation, cladding and upgraded the lighting. The initial research for the build indicated very little specialist tooling was required so I set about adding metalwork gear and stocking up on consumables to my toolkit.
Collection day arrived so I hired a van and drove over to Hinckley to collect along with the chassis dolly I picked up from another builder. A few friends helped me lift it out, set it down on the dolly and wheel it in to the garage. Over the next few months I ordered the ‘stages’ with the aim of paneling over the winter months. I added to the order the wishbones, bespoke uprights and hubs along with the shock absorbers.


Paneling began which was a slow process of masking up, measuring 30mm intervals and aligning the panels with pushpins, g-clamps and more measuring. I had originally intended to get an air compressor up and running however I began riveting by hand and got carried away. Even to now each rivet has been driven home by hand. And there are hundreds…


Once the cockpit internal panels were notched, filed and dry fitted I began the process of ‘skinning’ them with textured carbon vinyl and on the reverse sides I used Thermotec Cool-it acoustic and temperature insulation. This is an attempt to isolate the cockpit from the radiant heat of the coolant hoses running down both sides of the car. The rear bulkhead will be treated in a similar way. I opted for the double-skin kit so had a second panel to fit on the floor pan internally but left this until later to allow easier marking up of the floor panel itself. The radiator bay second skin also would also be left until the floor pan was complete.


I arrange some heavies to drop by for a hand with flipping the chassis over so I could set about fitting the floor panels. Once aligned, measured, marked, centered, drilled and de-burred I Waxoyl’d the drilled chassis holes. Each panel was subsequently bonded to the chassis, clamped with skin pins and then riveted. I actually managed to fit the entire three-section floor pan in one day just before Christmas Eve. Again, all by hand. After this was complete, I worked inside the upside down chassis and riveted the internal paneling.


Friends helping once again, we righted the chassis to reveal the carbon-wrapped paneling of the cockpit and it looked reasonably good. I decided to then have a dry run of the steering rack and column allowing maximum room without any suspension components in the way. I eased the bushes in for the column and polished the contact areas. Once the column was in I added the Universal joints and found they would foul on the extended pedal box bulkhead. This required some adjusting and cutting out until the UJ no longer contacted upon turning. I’ll fit a grommet and internal plate to seal it up at a later date when it’s in for the final time.


Next up was fitting the pedal assembly, adding the brake and clutch master cylinders then applying heat shield to the forward bulkhead. At this point I realized I should have maybe waited, as I hadn't cut the battery tray to fit. Fortunately as its ally once the tray had a template made up from cereal box it went fitted in place with some persuasion. Again this battery tray was skinned in carbon vinyl and I’ll add the securing strap and mounting pads later when I know the exact size of the battery I’ll be using.


Next up was fitting the double skin of the radiator bay and hole cutting this to allow mounting of the angled radiator. This went well with no problems really, the rad went in after the brackets were fitted and has foam seals either side.


Rack in place


Fans are upside down but put them there out of the way. Now secured to the rad using the zip through tie straps supplied.
After this I got all the bushes and pressed then into the wishbones apply copious amounts of grease, as they are allegedly quite bad for creaking if not. Offered the wishbones up to the chassis and dropped the bolts through, then added the uprights and hubs, and finally attached the dampers.


The luggage containers were then adjusted to fit more easily. I measured up the P-brackets to secure the coolant hoses that run either side and end up within the bodywork side pods.


The AP racing brake kit was bust open and the instructions tossed to one side, I just wanted to fit the discs on the hubs and pop the calipers on. They look impressive and are certainly more than capable of stopping this car. I've opted for the bigger brake kit over the standards. There's a split brake system on the Ultima using two master cylinders and a brake bias bar; I’ll get this locked off for IVA then go down the road of a bias control cable.


The handbrakes are separate calipers and are entirely mechanical. The cables were routed but not secured, this then allowed me to locate the correct position to drill through the aft bulkhead in order to connect the hand brake mechanism. Hole cutter is certainly getting some use.

Then it was time to align the air-con mounting bracket and secure the blower unit to tubular section above the foot well. The downward blower vents, fan speed switch and heater control are located on a panel on the underside of the dash. I will most certainly relocate these at a later date once IVA has been passed.


Once the bracket was ready to fix with rivets I opted to clean up and prepare the double skin for the foot well floor. This required some careful measuring and cutting to provide a cutaway for the driver’s pedal box area. Once sorted the leading edge of the panel angles downwards to meet the floor pan. I plan to fill this area with a non-slip mat or heel plate. I wasn't too concerned about keeping the rivet intervals level with each other on the cockpit sides, as the floor will be carpeted once complete and conceal the fixings. I also used some foam mat with foil lining and a thick carpet underlay in an effort to reduce drumming from the floor pan although this probably won't affect it too much.


The double skin was then bonded in and riveted, the protective film was removed and I was left with this.

In went the AC/heater blower and the control panel; this has been fitted with rubber base riv-nuts to dampen the control panel.


Next up was to sit down with the wiring loom and identify all the terminations which I handily transferred from a list supplied by the factory to a diagram. Spent a couple of hours in the warmth of the house by the fire tagging the ends up and letting the loom relax out of the coiled bundle it arrived in. As I’m using a small block Chevy engine I shouldn't have too much chop and changing to do with this loom. I offered this up to the chassis and cable tied in place, as when the body prefit is done I’ll have to route through bulkhead holes and may find it fouls the GRP in places. Found it somewhat exciting to see the central nervous system roughly in place on what has seemingly been a bare chassis for a while.


I started torquing the suspension bolts and fittings up then popped on a set of 19” alloy wheels I had from my other car that are handily the same PCD. As you can see the rears just aren't anywhere near wide enough and look totally out of place. I have the Braid wheels for the car now but holding off on the tyres until I need them in the summer. She will roll on these temporary wheels during body pre-fit stage.
Finally I took the steering column, collapsible boss and wheel and lined up the four holes for drilling. This took bloody ages and was far too fiddly but in the end it was bang on and I’m happy with the result. The boss was bolted up to the column and wheel and the wheels straightened. Next up is adjustment for alignment but that can wait for a warmer dry day soon.


I’ve probably forgotten to include some bits but I’ll add to this post when I remember.
Thanks for reading
Sam