


So after doing the preparation for the clear coat wrap last weekend I did jump in and apply the coating that you can see below in the video.
https://youtu.be/H7BljP_yE60
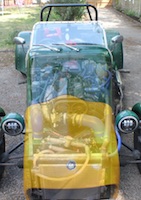
As you can tell in the last section of that I was not impressed with the outcome of the coating round the vertical part of the arch.
I pulled off the outside covering of the 3 ply and fitted the black stone guard to see if it would look any better.
spent some time polishing the other rear arch and not wishing to boast but after all the repair work I have carried out to it as well as the prep and paint, once polished it looks the nuts and the stone guard as well, great
Whilst still undecided if the wanted to apply the same clear covering to the 2nd arch I did the second video on the first arch.
https://youtu.be/bAXmMQJP2_c
Now I know the clear coating will protect the paintwork but is the look too much to pay, but also given the look of the uncovered arch will soon fad if pelted unprotected .
I also need to consider who will look at the car longer than it take to get into theirs and go
thoughts ?
Locost ''Eleanor'' Rebuild
Moderator: Contaminated
-
locost220

- Posts: 4490
- Joined: Sat Mar 13, 2010 7:31 pm
- Location: Lewisham South London
- Contact:
Re: Locost ''Eleanor'' Rebuild
Locost book chassis, Undergoing testing post rebuild 

Robin Hood 2B, keeping me sane
Sylva Leader, stuck to the trailer
Robin Hood 2B, keeping me sane
Sylva Leader, stuck to the trailer
-
b33fy

- Posts: 6326
- Joined: Sat Mar 31, 2012 11:40 am
- Location: Tonbridge
- Contact:
Re: Locost ''Eleanor'' Rebuild
Good effort Rich. I did my rear wings and had exactly the same issue when rolling the wrap around the wheel arch. I kept stretching it over the wheel arch until the wrinkles “disappeared” I was using coloured wrap and you could see the stretch in the colour. Clear might be easier in that respect. After stretching the wrap wasn’t in much of a state to tuck under and cover the wheel arch lip, another bit could be trimmed to cover it.
You made a last comment that might be worth pursuing??? starting from the rolled edge with the wrap and working it over the flat part. Logic says if you did it that way you would need to stretch the wrap to fit which is easier than shrinking it. Though when watching the pro’s at work, they tend to start with the largest flat areas.
You made a last comment that might be worth pursuing??? starting from the rolled edge with the wrap and working it over the flat part. Logic says if you did it that way you would need to stretch the wrap to fit which is easier than shrinking it. Though when watching the pro’s at work, they tend to start with the largest flat areas.
Power.. small nail, fast hammer, Torque.. small nail, big hammer.. I got a big hammer 
-
Weathers

- Posts: 1024
- Joined: Thu Nov 17, 2016 2:32 pm
- Contact:
Re: Locost ''Eleanor'' Rebuild
Great work. You're getting there. I want some protective film on a couple of areas on mine. Especially the nose and rear arches. I will be interested to see how you get on on the curvy bits!
-
ChrisL
- Posts: 1799
- Joined: Wed Jun 15, 2011 9:42 pm
- Location: Bedfordshire
- Contact:
Re: Locost ''Eleanor'' Rebuild
Weathers wrote:Great work. You're getting there. I want some protective film on a couple of areas on mine. Especially the nose and rear arches. I will be interested to see how you get on on the curvy bits!
All is revealed in the videos, very interesting Rich
Yes I've been drinking, what of it!!
-
locost220
- Posts: 4490
- Joined: Sat Mar 13, 2010 7:31 pm
- Location: Lewisham South London
- Contact:
Re: Locost ''Eleanor'' Rebuild
Things have not come out any better on the covering of the rear arches using reverse application, so been trying to get some replies out of professionals without reply so far.
In other news I have completed the flatting and polishing of the scuttle and rear panel to a nice standard,
By no means perfect or professional, but there clearly comes a stage where enough work is enough.
Looking at what I have achieved I am more than happy given the damage there were on these and the rear arches.
Now these are done I can push on with other work like fitting the new GBS aero screen I finally decided to get as the free one kept splitting, (free I wonder why), then scuttle, firewall, dash could fallow.
A bag of rubber trim from woollies greated me as I came home tonight so be nice to crack on when time allows.
Rich.
Locost book chassis, Undergoing testing post rebuild
Robin Hood 2B, keeping me sane
Sylva Leader, stuck to the trailer
Robin Hood 2B, keeping me sane
Sylva Leader, stuck to the trailer
-
greenwoo
- Site Admin
- Posts: 10185
- Joined: Thu Dec 03, 2009 10:34 am
- Contact:
Re: Locost ''Eleanor'' Rebuild
Interesting to see/hear whether the 'Pros' are willing to share their secrets...fair play for perseverance!
-
DJ.

- Posts: 6000
- Joined: Mon May 30, 2011 7:31 pm
- Contact:
Re: Locost ''Eleanor'' Rebuild
I have a nasty feeling the pros are using a subtly different material.
-
locost220
- Posts: 4490
- Joined: Sat Mar 13, 2010 7:31 pm
- Location: Lewisham South London
- Contact:
Re: Locost ''Eleanor'' Rebuild
Fire wall bolted to scuttle, scuttle and front interior panels fitted now I know longer need access for the scuttle fixing nuts.
Rear panel secured with 6 of it screws (the ones under the arches), stuck a rubber on the aero and loosely bolted it to the scuttle, not sure if to leave it black or go with body colour? , that was yesterday.
Today seem to have spent quite some time looking for lots of stuff, much of which I can't find
Fitted the bottom 5 bolts for the rear panel, made up and fitted a new tunnel brake pipe, (can't find the one that goes across the axle), fitted brake master cylinder so I could start on make another pipe
Fitted the many components that make up the pedal box and covers, including fitting acc pedal, fitted battery tray, Ecu and oil catch can.
Ruddy hot in garage at moment.
Rich.
- Attachments
-
Locost book chassis, Undergoing testing post rebuild
Robin Hood 2B, keeping me sane
Sylva Leader, stuck to the trailer
Robin Hood 2B, keeping me sane
Sylva Leader, stuck to the trailer
-
DJ.
- Posts: 6000
- Joined: Mon May 30, 2011 7:31 pm
- Contact:
Re: Locost ''Eleanor'' Rebuild
I don't envy you working in the garage this weekend!
-
locost220
- Posts: 4490
- Joined: Sat Mar 13, 2010 7:31 pm
- Location: Lewisham South London
- Contact:
Re: Locost ''Eleanor'' Rebuild
Managed to locate one of the missing boxes last evening, that being the home made metal mounting for the Rev and fog light that go on the rear panel, one of the lights and the trimmed shrouds that makes the lights sit vertical.
So after ordering a new rev light and bashing the pay pal a bit more today it was time to prepare the metal pieces that escaped the sand blasting and powder coating frenzy a few months ago.
What better time to be in a already stuffy workshop added with the appeal of a warm compressor and a powder coating oven a 180 deg.
At least with the tarp over the leaking roof and the temp the powder coating media did not need drying out.
All worked a treat and can fit these tomorrow.
Whilst moving the oven I also found the elusive brake pipe combination that goes across the axle, so whilst the oven was doing it stuff I used these as a pattern to make up a new set using the flaring tool and started to fit.
- Attachments
-
-
-
Locost book chassis, Undergoing testing post rebuild
Robin Hood 2B, keeping me sane
Sylva Leader, stuck to the trailer
Robin Hood 2B, keeping me sane
Sylva Leader, stuck to the trailer
Return to “Car Related Discussion”
Who is online
Users browsing this forum: No registered users and 39 guests